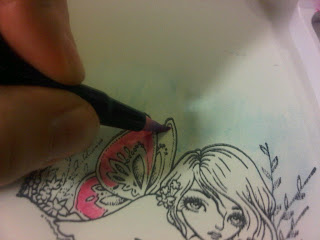
and I just had to get them inked up and start creating. Now as you know I am on a pretty tight budget so Copics just aren't an option for me, they are just too expensive. I have several techniques that I use that will still give you the depth, blending and shading that is such a popular draw in the copics. Option one is watercolour pencils and then blending them out using either a blending pen or a water brush (or a paint brush dipped in water). This technique takes some practice so you don't completely sog your paper while you blend, and your need to colour smoothly with the pencils or you may get an uneven look (as I did with the background in the picture below. I should have done the background first, not as an afterthought).

Option two, which is what I am going to show you today is how the rest of the picture was coloured is done using your inkpads (and I know you have them, don't lie!) and a blender pen. Let's check it out.
Supplies
- A stamp with some actual spaces for colouring
- Stazon ink
- Water based inkpads such as Close to my Heart or Ranger's distress inks
- Blender pen (available at your local scrap store, usually double ended and not refillable)
- Heavy white or offwhite cardstock
- Stamp your image using Stazon. This will keep the outline from bleeding while we play.

2. Shade your background colour with a coloured pencil or the blender pen and shade it out how you like. Remember it is better to start light and build. You can always add, taking away is much more challenging.


3. Next, how do we get the ink from the pad onto the blender pen? There are 2 methods and it depends on the shape of the ink pad you are using. I personally just squat the lid of mine into the top of the ink and scoop it up from there. Option 2 is a non-stick craft mat or a piece of wax paper. Stamp the whole pad down on it and pick up the ink from there


4. Now we are ready to start the fun part. I tend to start with larger areas first, but the more common (and one I will recommend) is to start with your lightest colour and work to your darkest. There are things like red lips that you absolutely can't do before you do the face, so make sure that you plan your mode of attack.
Ok now imagine this first. You have essentially loaded a paintbrush; wherever that lands will be the heaviest amounts of paint. It is the same with this technique. For the most natural looking art, I always imagine that the sun is beaming down from the left side of my workspace, making the most pronounced shadows on the left side of the image. So sweep your way from left to right (gently until you get the feel) and sweep by sweep, build up the colour until you are happy with it. Then move on to the next one.
It is VERY important that you clean the ink off your blender pen thouroghly between colours. The easiest way to do this is with a piece of paper towel or tissue and absorb it out.

Once you have all your colouring done, you can throw on some extra highlights in the hair, or on dress folds. This is the time to add things like sparkle highlights as well, but they don't show well on these pictures.

Ok, now it is your turn. Show me what you can do without using copics. Who knows, there may even be a prize in it for you.....

Ok, now it is your turn. Show me what you can do without using copics. Who knows, there may even be a prize in it for you.....


No comments:
Post a Comment