Showing posts with label card. Show all posts

Monday, August 10, 2020

August Cross Canada Blog Hop- Timber

Welcome to our August Blog Hop featuring Timber Creations. To purchase any of the items seen in our blog hop today, contact your local consultant to place an order. New core and season catty are coming for September, so make sure you order all the things you love now!


We hope that you will take the time to leave comments on our posts, as we love to get feedback from our viewers....whether it was something that you really liked or some new technique that was used that you would like to learn how to do....by leaving us comments, we get to hear what you like, and what you want to see. Thank you… now on to our hop. You should be joining us from Michelle Stewart's blog, and if you get lost a long the way she also has the master list


This card looks pretty simple gate fold card, but it has a surprise! I was inspired by a Youtube video by Jennifer McGuire to create this. So instead of just a single overlapped piece to close the card, there is a sentiment block hidden underneath!


Your next stop on the Cross Canada Hop is Pam Furlong

If you get lost along the way, you can head to Michelle's blog as she has the complete blog list.


Thanks for hopping along with us - we hope we were able to inspire you to get creative using some of the designs, products and techniques seen along the way. We hope you will join us again next month when we will be featuring projects created using the coming soon "Bloom with Grace" Collection (You all are NOT ready for the level of fabulous, so make sure you have something soft for you jaw to drop on when you see the new catties!!!). So mark September 10th on your calendars and hop along with us.

Wednesday, August 5, 2020

Atlantic Hearts Sketch 380 Challenge

Hi Friends,

I had some issues with scheduled posts, and the post reverting to previous drafts so I thought I would run a little test post. Bear with me if anything strange happens!

I thought this week I would use a sketch for some inspiration, and I would love if people would join in playing. This one if from the Atlantic Hearts Sketch Challenge who post new sketches weekly to help people get crafty.


Since I already had some of Close to My Heart's featured paper pack of the month open on my desk (Timber), I thought I would use a little of it. If you would like more inspiration, stay tuned for this month's Cross Canada Blog Hop on August 10th. Also keep in mind that this is the last month for not only the current 2019/2020 Core Catty, but also the Seasonal Catty that this paper is from. Make sure you order soon if you have anything left on your wish list!

If you have been following me lately on Facebook/ Instagram (@colleenscraftyconstructions) you will probably have noticed that I haven't been into creating scrapbook layouts, so this is another card. It uses CTMH Value pack cards as the base, and then all sorts of flannel papers. Initially I had in some wood grain paper instead of the plain brown, but a little bit more texture was needed to balance out all the intense patterns. 


I wasn't super excited about this paper initially, so I didn't purchase any of the coordinating stamp sets since I couldn't see myself getting a lot of use from them. Instead I used the "Channel the flannel" sticker from the coordinating sticker sheet, so this card is pretty masculine but still suitable for a variety of occasions. 

Thanks for stopping by!

Saturday, August 1, 2020

August SOTM Blog Hop- Floral Celebration

Welcome to our Stamp of the Month Blog Hop!  We will be featuring August's SOTM, which is Floral Celebration, a set of stamps.  If you have come here from Brandi Robinson's Blog, you are on the right path! The blog hop is a great big circle, so you can start here and work your way all around.  If you get lost along the way, you’ll find the complete list of participating consultants on Melinda’s Blog:  http://ifyoublingit.blogspot.com/p/stamp-of-month-blog-hop-list.html. 


This month we have Close To My Heart Consultants sharing their creations using this month's SOTM and other great CTMH products on their blogs. This is simple to do - just click on the link at the end of the post on each blog to move to the next one! Here we go!

I am really loving the colour scheme from the Summer Vibes paper pack (Fern, Smoothie, Candy Apple, Nectarine, Lemonade, Glacier) so that was what I drew on here. I did a lot of stamping, but my advice is start with the biggest flowers, and work your way down. The other thing you will notice is that I tried to create visual triangles of flower types (and colours since each flower was made the same). This helps give some movement on a potentially busy card. The black is Intense Black so that you can colour with alcohol markers  and not have smearing (I had a little early, so I did stop and heat set).


Once I was done colouring, I used the Alphabet Thin Cut dies to cut out "Hello". Make sure you use a ruler to get these straight (mine is, despite the angle of the photo)!! Then use some foam tape to pop up the letters. It is subtle but I love the impact. The background cardstock is Smoothie as well, since I didn't have a coordinating marker, and love the colour.


Products Used


Now "Hop" on over to Haley Dyer's Blog to see her work! Be sure to visit all the Consultants at their Blogs to get some great crafting ideas and other fun ideas! Remember, the August SOTM is only available until August 31st!  Contact your CTMH Consultant (or click here) to see how you can get this stamp set at a discount!

Tuesday, December 10, 2019

Cedar and Pine Cross Canada Blog Hop

Welcome to our December Blog Hop featuring Cedar and Pine Creations. To purchase any of the items seen in our blog hop today, contact your local consultant to place an order. This is the second of our new catalog, with the new 2 month model. If  you like these (or last month's Holly Jolly) and haven't purchased enough yet, they are only available until the end of the month!

We hope that you will take the time to leave comments on our posts, as we love to get feedback from our viewers....whether it was something that you really liked or some new technique that was used that you would like to learn how to do....by leaving us comments, we get to hear what you like, and what you want to see. Thank you… now on to our hop


If you have just hopped onto my blog, you can start here as this is a circular hop, but if you want to follow us across Canada then please start at the beginning .... OH WAIT... We miss Michelle already.. too much pressure! So if you get lost along the way, go check in with Brandi, or keep clicking until you are back here again.

I definitely wanted to have some great layouts done since both holiday packs are phenomenal. However, I have been looking for jobs, ran a bunch of card and tag classes and well, actually want to get Christmas cards out to family and friends... I didn't get them mailed last year, so since they were all blank I donated them to the Sea Cadet unit I grew up in and there are bidding wars going on, which is a nice feeling.

Long story short, you get to see the window card I did for my "Fancy Card" Class for my more advanced (and patient) customers. There are too many amazing holiday stamp sets this year, so I combined 2: the Cedar and Pine Cardmaking with the amazeballs nutcracker, and Merry Christmas Tree. I have used both for several types of cards this year, with a ton of different colour combinations. I think the favorite trick I used was colouring with shimmer brushes, especially the black. It just adds a really subtle bit of shimmer, with such deep colour. I am a glitter fiend, but am working on "less is more" since no one wants a glitter lap when they open cards. I did add some bling around the window to bring focus to the tree. This card is 5 by 7 which is a little bigger than normal, but the space was needed.

Some tips and tricks for window and stamping placement.

  • Put the paper on the front of your card first (you will have to add more glue around the window most likely, but trust the process). Don't put anything else on the front yet. 
  • Stamp.the inside of the window, and then position your oval thin cut (with the cut part facing up) over top. I had people use some washi to grab the front of the card when it closed up, then added some more. If you are a craftaholic and have a magnetic plate, that would be super easy too. 
  • Run it through your die cutting machine with the card open, depending on how thick the front is, you may have to do a few passes.
  • Now you can finish adding to the rest of your card
  • If you are better at erasing pencil than I am, you could definitely just cut the oval window, mark the widest points inside, then stamp but I tend to be too heavy handed. The stamp is just a tiny little bit bigger than the window, so you can't just stamp through it in this case. 


Your next stop on the Cross Canada Hop is the lovely Rosalynd at My Stamping Room

If you get lost along the way, you can head to Brandi's blog, as she has the complete blog list.


Thanks for hopping along with us - we hope we were able to inspire you to get creative using some of the designs, products and techniques seen along the way. We hope you will join us again next month when we will be featuring projects created using the coming soon "Spruced Up" Collection. So mark January 10th on your calendars and hop along with us.

Wednesday, April 10, 2019

April Cross Canada Blog Hop- Feels Like Home


Welcome to our April Blog Hop featuring artwork created using Feels Like Home collection. To purchase any of the items seen in our blog hop today, contact your local consultant to place an order.


We hope that you will take the time to leave comments on our posts, as we love to get feedback from our viewers....whether it was something that you really liked or some new technique that was used that you would like to learn how to do....by leaving us comments, we get to hear what you like, and what you want to see. Thank you… now on to our hop!


If you have just hopped onto my blog, you can start here as this is a circular hop, but if you want to follow us across Canada then please start at the beginning and join Michelle at Creations by Michelle. If you came from there, you are in the right place!

This month I needed a card that was worthy of the 91st Birthday of my amazing grandmother. I decided I wanted a pop up inside, and off to pinterest I went. This inside was pretty straight forward once you did a little playing, and can be found here  The base of my card is sugarplum cardstock, with the inside simple white daisy. I used the scallop embossing folder on mink cardstock, then used the Love in Bloom Layering stamp set with layers in archival black, sugarplum, sapphire (1st and 2nd generation), fern and new england ivy. This was cut out using oval die cuts, and I tucked some water coloured die cuts behind.

On the inside, I used the large scallop from the Border thin cuts to spice up the edges. The stamps are fussy cut out, and I shaded in the leaves and such using a water brush and ink pads. To make the sentiments pop up, I stamped them, and then on the back there are 2 scraps of paper that are glued down each side of the fold. I didn't take a proper picture of how I did that, apologies. It was not the best solution, as it does allow everything to fold up, but it doesn't pop up perfectly when the card is opened. You have to help them a little.


My grandmother seemed to like the card, so that is the main thing! Hope you like it too.

Your next stop on the Cross Canada Hop is Sheena at KanataNewf.

If you get lost along the way, you can head to Michelle S Blog, http://mycreationswithmichelle.blogspot.ca, as she has the complete blog list. (Please link this to my Deep URL)


Thanks for hopping along with us - we hope we were able to inspire you to get creative using some of the designs, products and techniques seen along the way. We hope you will join us again next month when we will be featuring artwork using the (BRAND SPANKING NEW) Sweet Girl collection. So mark May 10th on your calendars and hop along with us.

Thursday, February 15, 2018

February Cross Canada Blog Hop- Love and Friendships

Welcome to our February Blog Hop featuring artwork inspired by Love and Friendships. To purchase any of the items seen in our blog hop today, contact your local consultant to place an order.
We hope that you will take the time to leave comments on our posts, as we love to get feedback from our viewers....whether it was something that you really liked or some new technique that was used that you would like to learn how to do....by leaving us comments, we get to hear what you like, and what you want to see. Thank you… now on to our hop!

If you have just hopped onto my blog, you can start here as this is a circular hop, but if you want to follow us across Canada then please start at the beginning and join Michelle at Creations with Michelle. If you came from there then you are in the right place!

I am not super into Valentines Day, but I am in to puns, so when I saw the "We Belong Together" Stamp set I was inspired. I will be totally honest, this was a 10 card set with 2 of each design. As you can see there are only 4 cards pictured. My desk ate 1 of the designs, and I only had time for a cursory clean. All of the card patterns are out of the new "Make it From Your Heart Volume 4" Card map idea book and use Enchantment Fundamentals and cardstock. Images were stamped in Memento Black in, then coloured with our Shin-Han Alcohol Markers. I added a little water colouring around the bees because I found the marker very harsh. The hearts are the "Basic Heart" dies, with a little bit of shimmer trim.


Your next stop on the Cross Canada Hop is Nicky  of  Simply Artistic.
If you get lost along the way, you can head to Michelle S Blog, http://mycreationswithmichelle.blogspot.ca, as she has the complete blog list.

Thanks for hopping along with us - we hope we were able to inspire you to get creative using some of the designs, products and techniques seen along the way. We hope you will join us again next month when we will be featuring What we love about Spring. So mark March 15th on your calendars and hop along with us.

Thursday, August 20, 2015

Getting Ready for a NEW CATALOG!!!

Well Gang,

We are getting VERY close to the launch of the new Catty on September 1st, so today I thought I would share with you the cards we made for a gathering the other night. One is made with the outgoing "Blossom" paper pack and the super fun "Operation Smile Happy Everything" Stamp Set. I also used some Lagoon Thick Twine, our water brush, our dot embossing folder and some sponges to get the rainbow letters.

Fun fact: If you don't have a die cutting machine to emboss you can use a ROLLING PIN to emboss. For real

 The next card is to give you a SNEAK PEAK of Zoe, one of the new papers coming out (the polka dot is the front, and the blue hounds tooth is the back, although you can't see much of it. I have also used the gorgeous new Coral Shimmer Trim, Paper Birds Hostess Rewards set, and the Basics Fundamentals Whisper paper. I then did my normal inking, and a little sponging to make that gorgeous butterfly POP.

You should also check out all the other fun posts that the Braer's are doing today!! Check out these fantastic links below 

1. Brae Montgomery-http://wp.me/p4htXJ-FF
8. Nicky Scott - http://wp.me/p51mrp-Qc


Wednesday, September 26, 2012

I can see the future?


Ok so I really can't, other than the fact that whatever I post after tonight is going to involve some of the awesome polymer clay things using some new Martha Stewart silicone molds I got on sale today. Here is what they looked like before they went in the oven... they look pretty much the same now just, well... harder. Yes I am aware that I shouldn't cook polymer clay in the same oven I food with, but once isn't going to kill us. I am picking up my toaster oven for further endeavors.

So the other thing I bet you are wondering what those Glimmer Misted lollipop flowers look like now that they are dry. In a word, AMAZEBALLS. So great that I used one on this fantastic little birthday card I put together. Now before you ask I have no idea what any of the paper is, it just came out of the pile of scraps in my disaster and there were no identifying marks of any kind. What I can tell you is that this is another fabulous stamp from Kraftin Kimmie Stamps wonderful Three Wishes Set. I stamped her with Memento Tuxedo Black and heat set the image.

I then coloured her with Copics
Skin E00, E02, E11
Hair E13, E17, E18
Veils B12, B00
Body B28, B29, B32 (with tip touching)
Background BV08, BV13


Now I wanted to tie in the colour from the flower a little bit more, so I used the same spray on a light piece of paper and some of my new templates from The Crafters Workshop. The bling in the center of the flower is a bling button from CTMH. Then I stacked it all up and wrote a really sappy letter inside. Enjoy!

Friday, September 21, 2012

Mmmwahahahhahahaha... but Cuter

Well fine, I am a big nerd. In case you didn't know... Anyways I got these great new stamps from There She Goes Stamps,http://www.tsgstamps.com/Cutie_Pi_p/cutie-pi.htm the set is called Cutie Pi (I KNOW!!). I bought them because they have a Pi symbol on it but love the rest of them. So I thought I would concoct a little solution with some of the other cool things I have in my stash right now. Just a plain grey cardstock background, but to spice it up a little I did some first and second generation stamping with CTMH's Lagoon ink. The solid turquoise glitter paper (yep,  it exists thanks to American Crafts, it is called AC duotone Glitter paper... in this case Aqua) was surprisingly easy to cut with scissors. I traced around the outside of my spellbinder's die to get a small border. The stripey paper is from my Mind's Eye "My favorite things" paper pad (also contains mustache paper by the way...). This cutie is stamped on CTMH paper with Memento Tuxedo Black ink and heat set because well I have no patience or ability to plan my creative spurts. I also stamped out the beaker set  and the "According to my calculations UR the BOMB" Sentiment. I wanted to carry the glitter forward and add a little something to what she was stamped on, so I used my CTMH ultrafine glue and some Glitter Ritz to make a border. Just put on the glue and leave to dry for 5 minutes, then you can just rub the glitter on with your finger. Almost no mess for the win.


Now for the down and dirty deets for the colours. It is a combination of copics and Sakura Jelly Roll Pens.
Skin E11, E02, E00
Beakers/ Goggles C1, C2, C3
Hair E13, E15, E18
Clothes/Shoes B02, B04, B06
Beaker (in Hand) YR04,YR07, YR09

Other Beaker Fluids, hair bobbles and some details on shoes are with Jelly Rolls (you know for the added depth of glitter without the work)

I then fussy cut the beakers, threw some pop dots on things and then whacked the whole thing together. I tried to group a few beakers together to create some flow from the sentiment across the image. Then for some added depth I added some Liquid Glass (CTMH order #Z679) on all of the beakers and the lenses of her goggles.

Hope you like it.


Friday, September 4, 2009

Simon's Challenge for this week

So I am so sad that Beary Box has stopped doing challenges, but I am super excited to say that I have found simonsaysstamp.com which also has great designers and fun challenges. So this week they are celebrating one of the designers birthday (Happy birthday Heidi) and they have an amazing prize.


This week we were given a sketch and here is my take. The papers are Close to my heart from a kit I got when I went crazy one order last year. Flowers are something random that were on sale and the stamp is Rachelle Anne Miller (wish I had enough skills to put a happy face here). I just realized when I went to the blinkie that half the cards were done with RAM images. TEEHEE!!Coloured with water colour pencils and ink from CTMH.


Hope you enjoy it, thanks for looking.


Just realized that you can't see the embossing that was done with the cuttlebug folders on the green parts. It is the swirly one.

Monday, April 20, 2009

First House Mouse Submission

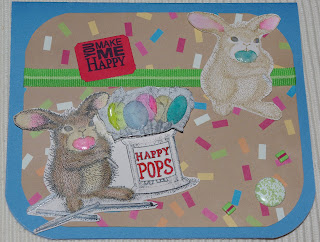
So I have always loved the House Mouse line of stamps from stampability and they have been on the list of things to buy for a while. However after my blogstalking resulting in finding the House Mouse and Friends Monday Challenge I had to splurge. I am REALLY certain that the definition of addict is to make a special trip to the stamp store for a challenge you think sounds like fun. I am so full of excuses.


So the challenge was to use multiple images on your project in any way you wanted. I ended up with 2 versions of my card and don't know which one I like better so I am posting them both. They both have several uses of multple images.

  1. I had to stamp each image multiple times to get all the details to show up the way I wanted


  2. I wanted to make the lollipops stand out so I stamped the image first on cardstock, then again onto white vellum. I cut the vellum lollipop wrappers out so they are a little crinkley like real suckers would be.


  3. In one card I sent cut out a 2nd bunny too.


So both cards are on CTMH cardstock, coloured with their inks and I used a sentiment from them as well. Dollar store ribbon. To make the lollipops shiney and have some definition I added some Glossy accents, and it doesn't show up very well on the picture but the cup is painted with Vanilla Bean twinkling H2Os. Also I wanted to have some dimension in the sucker sticks they are embossed with a plain white.


I am glad I found this website ladies, you are going to get a christmas card for next week because that was the only other house mouse stamp that our store has in stock (apparently they can't keep them on the shelf right now!!).

Monday, November 17, 2008

Beary Box Card Submission

Hello Again


I have completed my card and I am going to post the sketch


And I am going to post 2 pics of my card because in one you get a little overwhelmed by the glitter because of the flash, but I really want to showcase how beautiful this angel stamp I found in the depths the crop room of my Local Scrapbook Store (LSS) is.


I hope that these give you a good look. Other than the glitter and my colouring with watercolour pencils, I stuck to a very neutral brown pallet. The sentimant is "Love and Joy come to you". I am to excited about Christmas to make any other sorts of cards right now!!! I asked Santa for a Pentax D200 camera so we will see if I have been naughty or nice.

Hope you enjoy!