Thursday, August 18, 2011

You don't have to have Copics...

Let's try this again, since last time all my words started disappearing as I moved the pictures around to their proper position. So today I got these amazing stamps in from Sweat Pea Stamps
and I just had to get them inked up and start creating. Now as you know I am on a pretty tight budget so Copics just aren't an option for me, they are just too expensive. I have several techniques that I use that will still give you the depth, blending and shading that is such a popular draw in the copics. Option one is watercolour pencils and then blending them out using either a blending pen or a water brush (or a paint brush dipped in water). This technique takes some practice so you don't completely sog your paper while you blend, and your need to colour smoothly with the pencils or you may get an uneven look (as I did with the background in the picture below. I should have done the background first, not as an afterthought).


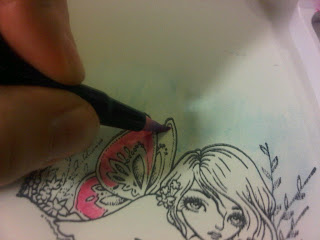
Option two, which is what I am going to show you today is how the rest of the picture was coloured is done using your inkpads (and I know you have them, don't lie!) and a blender pen. Let's check it out.

Supplies


  • A stamp with some actual spaces for colouring

  • Stazon ink

  • Water based inkpads such as Close to my Heart or Ranger's distress inks

  • Blender pen (available at your local scrap store, usually double ended and not refillable)

  • Heavy white or offwhite cardstock


  1. Stamp your image using Stazon. This will keep the outline from bleeding while we play.


2. Shade your background colour with a coloured pencil or the blender pen and shade it out how you like. Remember it is better to start light and build. You can always add, taking away is much more challenging.


3. Next, how do we get the ink from the pad onto the blender pen? There are 2 methods and it depends on the shape of the ink pad you are using. I personally just squat the lid of mine into the top of the ink and scoop it up from there. Option 2 is a non-stick craft mat or a piece of wax paper. Stamp the whole pad down on it and pick up the ink from there


4. Now we are ready to start the fun part. I tend to start with larger areas first, but the more common (and one I will recommend) is to start with your lightest colour and work to your darkest. There are things like red lips that you absolutely can't do before you do the face, so make sure that you plan your mode of attack.


Ok now imagine this first. You have essentially loaded a paintbrush; wherever that lands will be the heaviest amounts of paint. It is the same with this technique. For the most natural looking art, I always imagine that the sun is beaming down from the left side of my workspace, making the most pronounced shadows on the left side of the image. So sweep your way from left to right (gently until you get the feel) and sweep by sweep, build up the colour until you are happy with it. Then move on to the next one.


It is VERY important that you clean the ink off your blender pen thouroghly between colours. The easiest way to do this is with a piece of paper towel or tissue and absorb it out.


Once you have all your colouring done, you can throw on some extra highlights in the hair, or on dress folds. This is the time to add things like sparkle highlights as well, but they don't show well on these pictures.


Ok, now it is your turn. Show me what you can do without using copics. Who knows, there may even be a prize in it for you.....

Wednesday, August 17, 2011

Ok Ladies and Gents,


Sad news... my scanner will only work for cards, not 12 by 12 layouts. This means that you get a crappy blackberry picture again today. I will find my camera cord tomorrow, I promise!


So here is today's page for you. It is using a mix of K and Co. sparkley paper and ribbonthat I have only been hoarding away for 7 years. Gotta stop doing that, just use it and then I can get new expensive paper right? So the rest of the paper is Close to my Heart, the lettering is done using some Stickles (I think it is called Patina), and then I threw on some huge Heidi Swapp flowers with some unknown brand on top. There is a border under the pictures on the right which is from CTMH.


This layout features my beautiful baby girl second cousin's once removed; the next generation of our very close Coffin Clan. There are 3 beautiful girls shown here, and then 2 gentleman who were a little jealous of the attention the girls were getting. I don't know how well you can see it, but my fav picture is the first one on the right page; the little girl on the left (Leila) is trying to push over her cousin (Mya) who is holding on to the grass for dear life.


Again, sorry for the weird picture and the funny overlap. I will get better pics going as soon as possible.


Monday, August 15, 2011

Superfun with Glitter

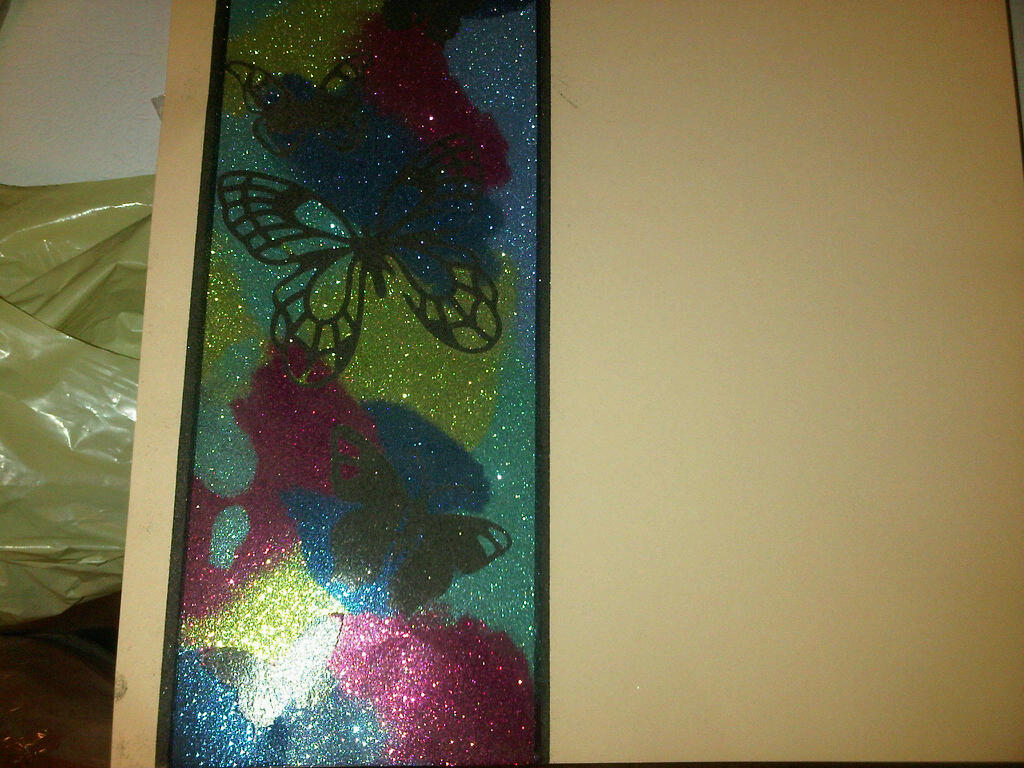
Good evening ladies and gents. Tonight for your viewing pleasure I have what may be my favorite page I have done ever. I will state straight up that this is a scraplift from the ladies at Carosel Rubber stamps.


Ok so for the items used


  • 115 mm and 2mm sookwang doublesided tape


  • several colours glitter ritz


  • mask shapes (plastic is the easiest to get off, but paper works too)


  • 1 piece of cardstock


  • mini muffin papers (I will explain later)


  • large craft mat or scrap piece of paper (has to be bigger than the paper you are working on)


  • paint brush or papertowel


  • An apron or garbage bag to cover yourself in....


Ok so here we go. First make sure that you have some clean space to work in because the tape is SUPER sticky. If you have one of those anti-static bags for embossing, rub down your cardstock and your craft mat, it will make things easier in the long run. Glitter ritz has a static charge to it, so it likes to stick.


  1. Put your tape as you would like it on your page. I won't judge you at all if you would like to cover your entire page, I know how awesome this looks! Remove backing and place masks how you would like them. Ensure that they are stuck down well, or glitter will sneak underneath and your design won't look as crisp


  2. Pour your first colour of Glitter ritz into the muffin papers. I find this is the easiest way to contain them, but you could also use a spoon or a straw. Gently cover the areas you would like in this colour. Gently use your finger to burnish (rub) the glitter into the area. This just ensures that you get a really rich covering and that other colours won't stick in the spaces


  3. This is the hardest part right now. You can't just tip to the side like you would with embossing powder or you will end up with a line of glitter. You must flip the page over completely in one swift motion, and then tap your layout. This will put all the excess onto your craft mat, then you can put as much as you can back in the jar. Make sure that your mat is completely clean before moving on to the next colour, so use the paintbrust or the paper towel to wipe it off. If you are using one, give it a static sweep too.


  4. Repeat with all of the colours until the tape is filled.


  5. To finish off your creation, use the 2mm tape to create a nice clean border. Lift up your masks, then use black (or your colour of choice) to fill in the borders.


  6. To ensure that the glitter doesn't invade your house, do another round of burnishing. The muffin cups and your fingers work well for this but you can also use a brayer.


  7. Add in your pictures, and if you get excited a few accents. I used a Close to my Heart crocheted flower, a pewter brad and a Prima flower that matched my glitter colours. To add some dimention I also added some butterflies the same as what I had used for masks, but only attached them in the center. Remember you need heavy duty adhesive like liquid glass when attaching to glitter


Have fun!! Love to see what you would do with this technique.


In other news, I promise better pictures from now on. I think that the scanner is going to work out.

Sunday, August 14, 2011

Wow. I REALLY Dropped the ball this time!

Ok I have been very lapse on posting, but I have tons of projects and ideas to share so lets get back at er.


Let's start with a quick update: business has improved slightly, I am no longer having stabbing belly pains but the doctors don't actually know why other than the low dose pain pills daily, still on leave from school but I am heading back to conquor the nerds in a few weeks. Close to my Heart has a new catologue out, our new paper is heavier and gorgeous and we have lots of great new accessories so you should totally check them out.


Moving right along; I am going to show you a workshop on the go layout that I did the other day using our "Sweetheart" set. It has liquid applique on it for a little bit of dimension, some epoxy accents and a whole slew of pictures. I did change around the colour scheme a little bit, I thought that there were too many hearts and my cotton candy stamp pad was mia so I used baby pink.


Hope you like the layout and we will see you tomorrow with another!


Monday, April 12, 2010

It's been a long time...

Ok so here is the 30 second catchup for everyone. Business isn't going as well as I would like, I seem to be my own best customer. On the upside I love the product and it has been all I have been using in my cards and pages lately so I will get posting so that you all (?) can see them. I had a very productive weekend at our Crop 4 Cancer getting 7 layouts done and I finally won a door prize. I am heading back to school in a few weeks and am unbelievably excited about that. I am hoping that over the summer I can manage to get more customers into my circle of people who love the Close to My Heart line.

Be back later with some new pictures and to talk about how excited I am that glitter is making a huge comeback!

Thursday, November 19, 2009

Big News

Well Boys and Girls.... or anyone else who happens to stop by here. I have big news. I have become a Close To My Heart (CTMH) Independant Consultant. I figured that I love to make cards and layouts so I should share my love with other people. The sailing season is over and there have been some other big changes in my life. My website isn't finished just yet, I have to get up some of my CTMH art but I would love for you to check out my website at http://colleendewis.myctmh.com/. The best part is that there is a special on this month that you can buy any 2 stamp sets and get a 3 for FREE!!!! That is right, I said FREE!!! All you have to do is place an order on the website and it will ship straight to you your door.

I love these products, and I especially love the paper packs that come all fully coordinated for you so there is no searching the store. Then as if that weren't enough, the colours in the papers match the ink, ribbon, brad and marker colours too so you can coordinate with ease!! How sweet is that?!?

Anyway, I will get back on track with my blogging since I am pretty much on a leave of abscense from life, and I am going to use it as a place to share ideas other than just finished projects that I create. Have a good one!

Friday, September 4, 2009

Simon's Challenge for this week

So I am so sad that Beary Box has stopped doing challenges, but I am super excited to say that I have found simonsaysstamp.com which also has great designers and fun challenges. So this week they are celebrating one of the designers birthday (Happy birthday Heidi) and they have an amazing prize.


This week we were given a sketch and here is my take. The papers are Close to my heart from a kit I got when I went crazy one order last year. Flowers are something random that were on sale and the stamp is Rachelle Anne Miller (wish I had enough skills to put a happy face here). I just realized when I went to the blinkie that half the cards were done with RAM images. TEEHEE!!Coloured with water colour pencils and ink from CTMH.


Hope you enjoy it, thanks for looking.


Just realized that you can't see the embossing that was done with the cuttlebug folders on the green parts. It is the swirly one.